Updated: 27.05.25
Have you ever dreamed of creating your own face cream or body lotion? If so, you’ve come to the right place!
At Formula Botanica – the world’s leading online organic cosmetic formulation school – we’ve taught thousands of students worldwide how to formulate and make their own natural skincare and haircare products. And you can do it too.
One of the first things you’ll learn about in our foundation Diploma in Organic Skincare Formulation is how to make an emulsion – aka your creams, serums, and lotions. An emulsion is simply a mix of oil and water, brought together by a special ingredient called an emulsifier.
While there are many emulsifiers out there, a great one to start with is Olivem 1000. Made from olives and RSPO-certified palm oil, it is easy to use, widely available, and perfect for beginners. And in today’s post, I will show you how to make a simple emulsion using Olivem 1000.
What is an emulsion?
An emulsion is a combination of oil and water – two ingredients that don’t naturally mix. To bring them together, you need to use an ingredient called an emulsifier, which helps bind the oil and water into a stable and uniform blend. Curious to learn more about emulsifiers and how they work? Then check out these helpful posts:
What is Olivem 1000?
- INCI: Cetearyl Olivate (and) Sorbitan Olivate
- Solubility: Oil-soluble (hot-process)
- Usage rate: 3-8%
Olivem 1000 is a naturally-derived emulsifier designed for oil-in-water (O/W) emulsions, which are much lighter than water-in-oil (W/O) emulsions. It is suitable for all skin types, relatively easy to use, available worldwide, accepted in natural skincare, and, incidentally, the first emulsifier we teach you about in our Diploma in Organic Skincare Formulation!
As you progress in your formulation skills and move on to the Advanced Diploma in Organic Cosmetic Science, you will be introduced to other emulsifiers and advanced emulsion technology.
How to make an O/W emulsion with Olivem 1000
Now for the fun part: let’s make an organic oil-in-water emulsion using Olivem 1000!
When you purchase Olivem 1000 (or any other emulsifier), your supplier usually provides you with basic usage guidelines and a few sample formulations to help you get started.
But if not, no worries! Below, you’ll find a simple base formula to get you started. Think of it as your blank canvas: a reliable, flexible starting point that you can tweak, personalise, and build on as you grow more confident in your formulating skills.
The KISS principle
When you’re working with a new emulsifier – like Olivem 1000 – or trying out a new formulation method, the best approach is to keep it silly simple. At Formula Botanica, we call this the KISS principle (Keep It Silly Simple). The simpler your formula, the easier it is to spot what’s working and what’s not. It will also save you time, money, and frustration.
While the formulation below might seem simple (or even a little boring), that’s exactly the point. Keeping things simple allows you to focus on how the emulsifier behaves, determine the ideal ratio between your oil phase and emulsifier, and monitor the stability of your emulsion over time.
Once you’ve mastered the basics, you’ll be ready to build on this foundation and start creating more luxurious and complex formulations.
Our free sample formulation
For this sample formulation, I kept things simple. I used distilled water as the base, organic sweet almond oil as the carrier oil (you can easily swap this out for any other neutral oil, as long as it has an iodine value below 100), vegetable glycerine as the humectant, and Solagum™ AX as the gelling agent. If you don’t have Solagum™ AX, xanthan gum or another compatible gum will work just fine. I’ve also added vitamin E as our antioxidant and Verstatil® TBG MB as our natural preservative.
I’ve also used Dermofeel® PA-3, a natural chelating agent, which helps support the preservation system. However, if you’re just starting out, you can skip this ingredient and increase your water phase by 0.1%. To finish, I’ve added a few drops of a 25% sodium hydroxide (NaOH) solution to adjust the pH of the formula.
Don’t worry if this sounds a bit technical right now – we explain everything step-by-step in our courses, so you’ll soon feel confident working with these kinds of ingredients.
Makes: 100g
Level: Beginner to intermediate (requires some basic formulation knowledge)
Method: Hot-process
| Phase | Ingredient | INCI | Weight (g) |
| A | Sweet almond oil (or any other oil) | Prunus Amygdalus Dulcis (Sweet Almond) Oil | 25.00 |
| A | Olivem 1000 | Cetearyl Olivate (and) Sorbitan Olivate | 5.00 |
| B | Distilled water | Aqua | 63.70 |
| B | dermofeel® PA-3 | Sodium Phytate (and) Aqua (and) Alcohol | 0.10 |
| C | Vegetable glycerine | Glycerin | 4.00 |
| C | Solagum™ AX | Acacia Senegal Gum (and) Xanthan Gum | 0.40 |
| D | Vitamin E | Tocopherol | 0.50 |
| E | 25% NaOH solution | Sodium Hydroxide | A few drops |
| E | Verstatil® TBG MB | Triethyl Citrate (and) Glyceryl Caprylate (and) Benzoic Acid | 1.30 |
| Total: 100.00 |
Equipment:
- Glass beakers
- Glass rod
- Mini whisk
- Scales
- Pipettes
- Water bath setup
- Thermometer (optional)
- Packaging: Glass jar or pump bottle
Formulation method:
Step 1: Clean and sanitise your lab
Clean and sanitise your home lab, tools, and equipment.
Step 2: Weigh and heat the water and oil phases
Weigh and heat the oil-based ingredients (sweet almond oil and Olivem 1000) in a beaker and place the beaker in a water bath.
In a second beaker, weigh the water and Dermofeel® PA-3 (chelating agent). In a third beaker (or watch glass), weigh the glycerine and Solagum™ AX. Disperse the gum thoroughly in the glycerin using a glass rod until fully combined.
Once dispersed, add this gum mixture to the water phase, and place the beaker in the water bath. Note: Alternatively, you can add the gum-glycerin blend after combining the oil and water phases, but ensure it is fully incorporated and hydrated.
Heat both beakers to around 75°C.
Step 3: Mix oil and water
Once the emulsifier (Olivem 1000) has fully melted, slowly pour the oil phase into the water phase while stirring. This helps begin the emulsification process. Homogenise the mixture briefly with a homogeniser or mini whisk for a few short bursts, being careful not to incorporate any air.
Step 5: Cool down the emulsion
Cool down the emulsion to around 40°C, then add the vitamin E.
Step 7: Measure and adjust the pH
As the mixture cools further (down to about 25°C), prepare a 10% dilution of your emulsion to test the pH. In this example, the pH was 6.1. Since I know from experience that this preservative can lower the pH, I’ve added a few drops of 25% sodium hydroxide solution to slightly raise the pH before adding the preservative.
We teach you how to measure and adjust the pH of your formulations in our foundation Diploma in Organic Skincare Formulation.
Step 8: Add the preservative
Add the preservative and blend. Make another 10% dilution of the emulsion and re-measure the pH. Readjust the pH if necessary. In my case, it was 5.45 which is exactly in the right range. All that’s left to do is to package and label your emulsion!
Formulations notes
I’ve made two versions of this emulsion – one with gum, and one without – to see how they compare in texture and stability.
In the first version, I kept things very simple and left out the gum entirely. In the second, I’ve added 0.4% Solagum™ AX. Visually, the difference was subtle but noticeable: the gum-free version (on the left) had a slightly runnier texture, while the one with gum (on the right) was a touch thicker and felt more structured. Both had a smooth, pump-friendly consistency – perfect for a day cream.
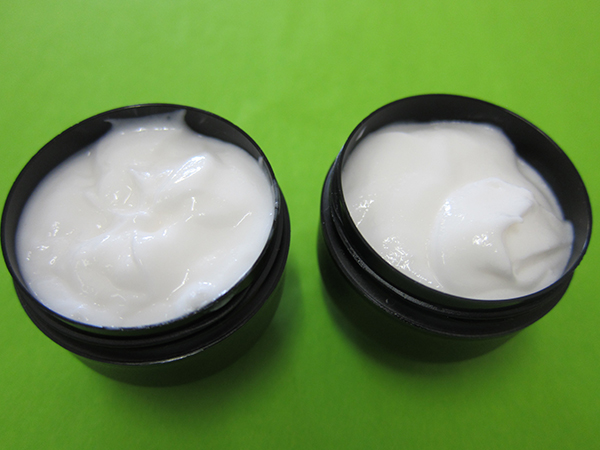
I did notice a faint soapy feel in both samples – something quite common when working with Olivem 1000, especially in freshly made emulsions. It usually settles down a bit after a few days of maturation.
To see how they’d hold up over time, I also ran some basic thermal stability tests. The version with gum held strong, even under warmer conditions. The gum-free sample, on the other hand, didn’t perform as well – it started showing signs of instability, particularly when exposed to heat.
This little experiment just goes to show how small tweaks, like adding a gum, can make a big difference in your formulation’s texture and long-term performance. It’s all part of the fun (and learning curve!) of becoming a formulator.
Tips for working with an O/W emulsifier
Whenever I work with a new oil-in-water emulsifier – like Olivem 1000 – I follow a simple, tried-and-true process. This helps me understand how the emulsifier behaves and ensures I get consistent results without wasting ingredients. Here’s how I do it:
- Unless specified otherwise by the supplier, I typically keep the oil phase between 15–25%. This range tends to work well with most emulsifiers, allowing them to perform at their best.
- Similarly, unless directed otherwise, I use an emulsifier-to-oil ratio between 1:4 and 1:5 (emulsifier:oil).
- I heat the oil and water phases separately. I also set my water bath temperature to about 5–10°C above the melting point of the ingredient with the highest melting point. I don’t adhere to the “heat and hold” method as it can cause ingredient degradation, promote oxidation, and lead to water loss (among others). If you’ve seen this method recommended by DIY blogs or courses, ignore it.
- Once everything is melted and uniform, I slowly add the oil phase into the water phase, blending gently. While there are exceptions to this method, I stick with this process for most standard emulsifiers.
- You can either add the gum and glycerine blend to the water phase before heating with the rest of the water-soluble ingredients, or blend the gum and glycerine in a separate beaker and set aside and add it to the emulsion after the oil and water phases have been fully combined. The advantage of adding it to the water phase is that it reduces the chances of clumping, which xanthan gum is known for, and by the time it’s heated, the gum is hydrated.
- I let the emulsion cool down slowly, stirring continuously to achieve a smooth, stable blend.
- Once the emulsion cools to under 40°C, I add my heat-sensitive ingredients, like vitamin E or extracts.
- As the emulsion gets close to room temperature (around 25–30°C), I check the pH. Most emulsions for skincare need to be between pH 4.5–5.5, depending on the preservative system you’re using. To measure the pH, I make a 10% dilution in distilled water and check the pH with a strip or a pH meter. If I need to lower the pH, I add a diluted acid (like citric or lactic acid). If I need to raise it, I use a diluted base (such as sodium hydroxide, bicarbonate, or arginine). I never use powders to adjust pH at this scale – I always make a dilution first.
- Once I’ve adjusted the pH, I add my preservative and blend again. Most preservatives will shift the pH slightly, so I always recheck it and make a final adjustment if needed.
- Finally, I give the emulsion a final mix and divide it. A small portion goes into stability and microbial testing; the rest is poured into my container of choice.
And that’s it! That’s how I create a basic, stable oil-in-water emulsion. Once I know how an emulsifier works, I can start building on it and creating more luxurious formulations.
Curious to learn more? Then check out our Diploma in Organic Skincare Formulation, where you’ll learn how to create over 25 skincare products – including emulsions – and become a certified organic skincare formulator.
If you’re already a formulator but would like to take your formulations to the next level by incorporating advanced techniques and advanced high-performance ingredients, our Advanced Diploma in Organic Cosmetic Science is for you.
Become a certified cosmetic formulator
Now it’s your turn to get creative! Try making the sample organic oil-in-water emulsion with Olivem 1000, or use it as a base to design your own custom formula.
I’d love to hear about your experience – leave a comment below and let us know how it went!
If you’re curious about how we teach organic cosmetic formulation at Formula Botanica, register now for our free sample class and take the first step toward becoming a certified formulator!
FAQ
- What is an emulsion?
An emulsion is a mixture of oil and water – two ingredients that don’t naturally mix. You blend them together using a special ingredient called an emulsifier.
- What is an emulsifier?
An emulsifier is an ingredient that helps bind oil and water together in an emulsion. Without an emulsifier, your oil and water phases would naturally separate.
- What is Olivem 1000?
Olivem 1000 is a naturally-derived emulsifier made from olives and RSPO-certified palm oil. It’s designed for oil-in-water (O/W) emulsions, so it’s perfect for lighter, daytime skincare products. It is typically used in formulations at 3-8% and is a community favourite at Formula Botanica.
- How to make an emulsion with Olivem 1000?
To make an emulsion with Olivem 1000, follow our frame formulation listed above. This formula provides a reliable starting point that you can build upon as you gain more confidence in your formulation skills. We also teach you how to formulate with Olivem 1000 in our Diploma in Organic Skincare Formulation.
- How to customise an emulsion?
Once you’ve mastered the basics, you can customise your emulsion by swapping water for a hydrosol, using different botanical oils or extracts, trying new humectants or emulsifiers, adjusting the texture with gums, or changing the preservative system. As long as you follow your supplier’s guidelines and have some formulation knowledge, the sky’s the limit!
- Where can I learn to formulate?
You can learn to formulate organic skincare products, including emulsions, at Formula Botanica, the world’s leading online organic cosmetic formulation school. Check out our award-winning courses and find out which would be the best for you!
FREE TRAINING
Learn how to become an
Organic Skincare Formulator
FREE TRAINING
How to become an
Organic Skincare Entrepreneur
FREE TRAINING
How to become an
Organic Skincare Entrepreneur

Dr. Elham Eghbali was Formula Botanica’s Cosmetic Chemist between 2014 and 2018. She has over 20 years’ industry experience and is based in Bavaria, Germany. To read more about Formula Botanica’s team, visit our staff page.


