Most of us in the organic skincare community love using natural cosmetic waxes. They are definitely one of the most versatile, multi-functional ingredients out there. Before we start assessing various natural waxes, let’s take a look at the important roles they play in our cosmetic formulations. These include:
- improving texture
- increasing viscosity
- adding shine
- improving hardness / solidity
- improving overall stability
- increasing/adjusting the melting point
Not all natural cosmetic waxes come with the same benefits though nor are all waxes equal and able to replace each other in different types of formulations. So, in this post, we are going to focus on the properties and practical applications of some common and favourite waxes used in natural formulations. When trying out these waxes in your own formulations, bear in mind that we carried out our tests in a Northern European temperate climate. If you live in hotter or more humid parts of the world, the waxes might perform differently and be softer at room temperature.
Defining Natural Cosmetic Waxes
What is a wax?
Waxes fall into the category of lipids. From a chemical standpoint, waxes are a happy union of hydrocarbons and fatty esters (which is an ester of a fatty alcohol and a fatty acid).
Beeswax in Cosmetics
Beeswax is one of the most commonly used waxes in cosmetics and other daily-use products. In the production of beeswax, humans do next to nothing. So you can say that beeswax is an all-natural product as it is made by hard-working, female worker bees.
These bees have wax-producing glands on their abdomen. Bees consume honey that they have produced from the collected flower nectar. The glands convert the sugar in the honey to wax, which is then secreted through tiny pores in the bee’s body as droplets that harden into wax when exposed to air.
These droplets sit as tiny, transparent flakes on the abdomen of the bees. After being chewed and then processed by the bee’s salivary secretions, the wax turns white and becomes soft and pliable enough to use as a construction material for the bees’ honeycomb which acts as a protective shield to keep out all the bad guys (such as competing, raiding bee colonies and pests).
The wax gradually changes colour through the incorporation of honey, pollen and propolis and darkens with age. Depending on the type of honey and pollen, the colour of beeswax varies from tones of yellow, orange and even red to brownish black.
All around the world, bees are at risk of becoming an endangered species so it goes without saying we need to take good care of them. Worker bees need to eat 2.5 kg to 3.5 kg of honey to produce less than 0.5 kg of wax that is the building block and protective shield for their home – the honeycomb.
Beeswax remains a gorgeous addition in our formulations, but it’s not surprising that many formulators prefer vegan waxes in order to protect our lovely bees. If you use beeswax, we would like to recommend to do so sparingly and source it ethically and, if possible, from a local beekeeper whose bee-keeping practices you can see at first hand.
As a side note, we have seen many formulators and students using bees and other natural cosmetic waxes as emulsifiers. If you want to learn why this is a mission impossible, read our post on beeswax is not an emulsifier.
Vegan Cosmetic Waxes
Vegan waxes are derived from leaves, peels and fruits of different plants, or are separated from plant oils by de-waxing. De-waxing is where the wax gets separated or extracted through physical filtration. Then the wax usually goes through a process of refining and deodorising (because a lot of people dislike the typical waxy scent).
This may sound a bit scary, but up until now, these are all physical procedures and there is still no chemical reaction involved. The moment bleaching is involved to make waxes whiter it becomes problematic for the all-natural formulator to use them. Have a listen to our podcast entitled ‘What does natural skincare mean’ to learn all about the different shades of natural in cosmetic formulating.
Because these ingredients are derived or extracted from a plant or a plant oil, they are considered as true waxes. For more technical information, see also our post reviewing six vegan waxes.
Differences in Natural Cosmetic Waxes
We see a lot of queries in our community about how best to use individual natural cosmetic waxes and what proportions to try. So, we have carried out comparative tests to help you assess the waxes and decide what ratios to use in your own formulations.
Keep in mind that the percentage will be different in stick formulations like our facial cleansing stick; our Amazonian lip balm in a jar; and our whipped lip scrub formulas. In this post, we focus on anhydrous balms in a jar.
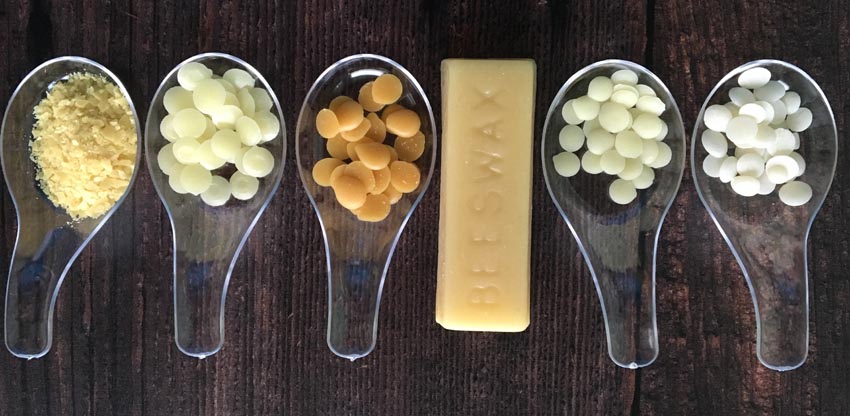
We are going to test six different waxes:
- Myrica wax (INCI myrica cerifera fruit wax): melting point 45-55°C
- Berry wax (INCI rhus verniciflua peel cera): melting point 48-54°C
- Beeswax (INCI cera alba): melting point 61-65°C
- Candelilla wax (INCI euphorbia cerifera cera): melting point 68-73°C
- Rice bran wax (INCI oryza sativa cera): melting point 79-85°C
- Carnauba wax (INCI copernicia cerifera cera): melting point 80-86°C
As you can see, there are big differences in the melting points of these waxes. To make our life easier, we are going to divide them into three categories:
1. Soft waxes: myrica wax and berry wax
They are not suitable to use as standalone waxes to create hard stick formulations, but work well in combination for this purpose with a medium or hard wax.
General recommendations: 5-30% in a jar or a stick.
2. Medium waxes: beeswax and candelilla wax
General recommendations:
- 5-20% in a jar
- 10-30% in a stick
3. Hard waxes: rice bran wax and carnauba wax
General recommendations:
- <5% in a jar
- 5-10% in a stick
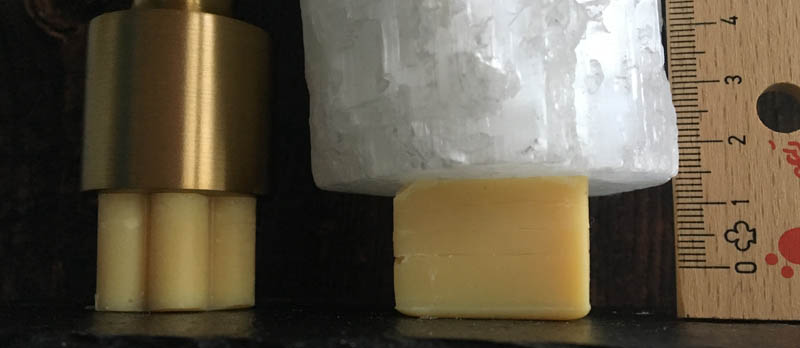
This division makes clear why it doesn’t make sense to add, let’s say, 40% carnauba wax into products, not even in a stick. Here is the formulation for this fun experiment I have done:
40% carnauba wax
30% shea butter
29.5% grapeseed oil
0.5% vitamin E
The results are two rock solid blocks that will remain rock hard, even in the Amazonian Forest! I put two heavy weights on them (300g and 650g) for 24 hours and kept at room temperature yet they didn’t budge a nano-millimetre and remained rock solid.
Testing Out Natural Cosmetic Waxes
We are going to apply the ‘Keep It Super Simple’ (KISS) approach so we can easily compare the waxes.
As always, the synergy between wax + butter + oil needs to be ideal in order to create a stunning product. For these experiments, the butter content remains the same, and we are varying our wax and oil percentages. As always, we stir all samples until a trace appears to ensure products have optimal long-term and overall stability.
Method for all samples:
1. Melt butter and waxes to a temperature that is required to melt the ingredient with the highest melting point.
2. Add oil and vitamin E.
3. Stir to a trace before pouring into jars.
Testing the soft waxes: berry wax (yellow spoons) and myrica wax (red spoons) @ 5% and 30%
| Sample 1: berry wax @5% | Sample 2: berry wax @30% |
| 5% berry wax: 1.5g | 30% berry wax: 9g |
| 45% shea butter: 13.5g | 45% shea butter: 13.5g |
| 49.5% grapeseed oil: 14.85g | 24.5% grapeseed oil: 7.35g |
| 0.5% vitamin E: 0.15g | 0.5% vitamin E: 0.15g |
| 30g | 30g |
| Sample 3: myrica wax @5% | Sample 4: myrica wax @30% |
| 5% myrica wax: 1.5g | 30% myrica wax: 9g |
| 45% shea butter: 13.5g | 45% shea butter: 13.5g |
| 49.5% grapeseed oil: 14.85g | 24.5% grapeseed oil: 7.35g |
| 0.5% vitamin E: 0.15g | 0.5% vitamin E: 0.15g |
| 30g | 30g |
Observations:
- Even though there is only a small difference in melting temperatures, the myrica wax takes longer to stir to a trace than the berry wax.
- Both waxes create products with a soft, gentle and silky touch.
- The scent of both waxes is totally different; preference is completely personal. There is a difference in raw materials and in finished products, so don’t judge by sniffing the wax pellets only.
- There is a difference in texture in both waxes; which one to use depends on your aim and goal for the end product. Berry wax creates more gel-cream-feeling textures, while myrica wax creates more cream-cream-feeling textures.
- 5% samples are soft balms, easy to scoop out.
- 30% of these waxes in a formulation to package in a jar is more than enough in moderate climates for nice and easy application; consistency is comparable to raw soft butters like shea and mango.
- Perfect for formulations in jars.
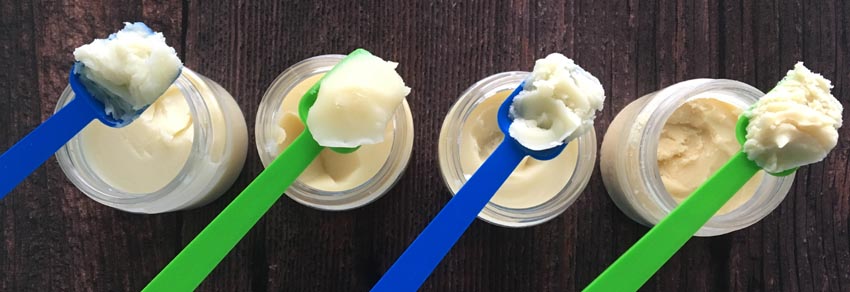
Testing the medium waxes: beeswax (blue spoons) and candellila wax (green spoons)
@5% and 20%
| Sample 5: beeswax @5% | Sample 6: beeswax @20% |
| 5% beeswax: 1.5g | 20% beeswax: 6g |
| 45% shea butter: 13.5g | 45% shea butter: 13.5g |
| 49.5% grapeseed oil: 14.85g | 34.5% grapeseed oil: 10.35g |
| 0.5% vitamin E: 0.15g | 0.5% vitamin E: 0.15g |
| 30g | 30g |
| Sample 7: candellila wax @ 5% | Sample 8: candellila wax @ 20% |
| 5% candellila wax: 1.5g | 20% candellila wax: 6g |
| 45% shea butter: 13.5g | 45% shea butter: 13.5g |
| 49.5% grapeseed oil: 14.85g | 34.5% grapeseed oil: 10.35g |
| 0.5% vitamin E: 0.15g | 0.5% vitamin E: 0.15g |
| 30g | 30g |
Observations:
When it’s not a crazy heat wave, my kitchen lab is always around 20°C. 20% of these waxes is already a challenge to stir to a trace: you need to keep stirring the blend, as there is no time to put the beaker down and leave it be. There is no need to use a cold water bath nor fridge.
- It’s easy to get tempted to scrape solidified and molten bits on the sides of your beaker back into your beaker to avoid waste. I wouldn’t recommend this, as these will create (visible) snowflakes in your finished product: tiny hard bits and graininess later on.
- Typical beeswax scent versus a plant-based wax. Again, preference is personal.
- The 5% samples are still comparable to the 5% samples of the soft waxes albeit a bit more sturdy: still soft, gentle, and lovely to apply. Easy to scoop out. Candelilla has a heavier feeling compared to beeswax.
- 20% of these waxes in a jar is more than enough in a moderate climate; comparable to the 30% of the soft waxes but with a little bit more body to it.
- With these waxes it’s totally possible to create nice, stable products both in stick formulation and in a jar.
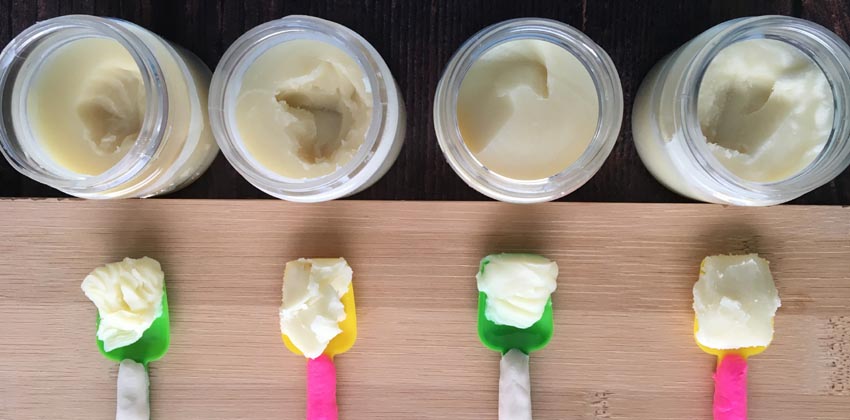
Testing the hard waxes: rice bran wax (yellow with pink spoons) and carnauba wax (green with white spoons) @ 2% and 5%
| Sample 9: rice bran wax @ 2% | Sample 10: rice bran wax @ 5% |
| 2% rice bran wax: 0.6g | 5% rice bran wax: 1.5g |
| 45% shea butter: 13.5g | 45% shea butter: 13.5g |
| 52.5% grapeseed oil: 15.75g | 49.5% grapeseed oil: 14.85g |
| 0.5% vitamin E: 0.15g | 0.5% vitamin E: 0.15g |
| 30g | 30g |
| Sample 11: carnauba wax @ 2% | Sample 12: carnauba wax @ 5% |
| 2% carnauba wax: 0.6g | 5% carnauba wax: 1.5g |
| 45% shea butter: 13.5g | 45% shea butter: 13.5g |
| 52.5% grapeseed oil: 15.75g | 49.5% grapeseed oil: 14.85g |
| 0.5% vitamin E: 0.15g | 0.5% vitamin E: 0.15g |
| 30g | 30g |
Observations:
It’s quite a challenge to work with these kinds of waxes as they solidify almost immediately when you turn off the heat.
- To prevent a shock effect and premature solidifying of ingredients (creating snowflakes, graininess, …) we recommend turning the heat off once the wax/butter mix has melted. Then, keep the beaker in the water bath and add the other not so heat-sensitive ingredients that you have kept at around 30°C to this blend but while it’s still in the hot water bath. Then stir.
- Remove from the water bath and try to keep calm and stir without stopping. At around 55°C, the blend calms down and you can breathe and relax a bit again. There won’t be light trace yet, but you will start to see the colour changing. At the lightest of traces, you can add your most heat-sensitive and precious ingredients, blend them in well, acting quickly, and pour into your containers. All of this last stage happens really fast.
- You will notice a huge difference in texture with only a small difference in percentage!
- There will be no rock-solid finished products, but instead lovely feeling balms with more body compared to all the other samples. The 2% samples are a bit like ice cream that comes straight out of the fridge.
- With rice bran wax you can have a bit of white dusting on the top layer, but this disappears after your cycle of cool down and adjusting to room temperature.
- These waxes certainly can be helpful to add in small percentages to formulations for jars and to produce improved stability. They can certainly be used as standalone waxes, or in combination with a soft or medium wax to create stick formulations.
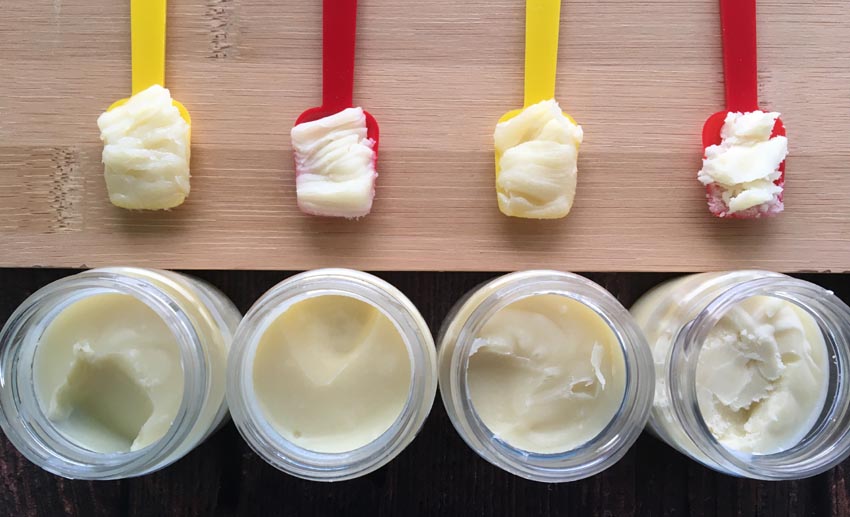
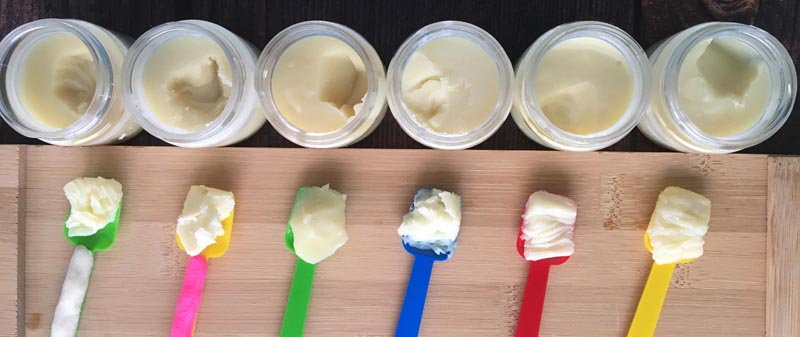
And last but not least, let’s make a comparison of all the waxes used @5%.
Look at all those different textures and creaminess.
I hope this post has inspired you and gave you plenty of food for thought and tips for your future formulations using natural cosmetic waxes.
Now it is your turn to test out some natural cosmetic waxes and see how they perform in your formulations. Leave us a comment below to tell us how you got on and about your favourite waxes.
If you want to learn more about working with waxes and other fantastic, natural skincare ingredients, check out our Diploma in Organic Skincare Formulation. Have you pre-registered yet? Just sign up to stay informed about all our organic skincare formulation courses. In the meantime, try out a sample class to find out more about learning with Formula Botanica.
If you’ve been formulating for a while and are considering starting your own beauty brand, check out our brand new Diploma in Beauty Brand Business Management.
Suggested Suppliers
For waxes in general:
Aromazone
Berry wax
Alexmo Cosmetics (Germany/EU) & other waxes:
Alexmo Cosmetics (Germany/EU)
Myrica wax
Formulator Sample Shop (US)
and Sheabutter Cottage (UK/EU)
FREE TRAINING
Learn how to become an
Organic Skincare Formulator
FREE TRAINING
How to become an
Organic Skincare Entrepreneur
FREE TRAINING
How to become an
Organic Skincare Entrepreneur
Leave us a comment

Jilly Schechter is a Tutor at Formula Botanica, where she helps our students to become better organic cosmetic formulators. Jilly lives in Belgium and loves writing tutorials on how to make skincare and haircare.

